UI Widget Framework
The Calibo Accelerate platform user interface is built using the React framework. Follow these instructions to build UI widget adapters, including a Configuration Widget and a Data Pipeline Node Widget tailored for your specific integration requirements.

Configuration Widget
A configuration widget facilitates platform expansion by enabling end users to configure new technologies, thereby establishing integration with various tools. Each technology comes with its distinct setup requirements; for instance, a database might necessitate details such as hostname, port, and database name for connection establishment. Additionally, certain technologies mandate access to a secrets store for safeguarding sensitive information like passwords or access keys. The platform simplifies these complexities through the implementation of various interfaces.
The configuration widget is composed of a user interface (UI) screen that incorporates UI elements to facilitate configuration setup. For instance, input elements could include hostname, port, and URL. Dropdown elements allow the selection from the existing choices, and buttons can enable functions like testing connections.
To develop the UI screen, React Bootstrap should be employed as the design system for constructing UI components. Consistency with the platform's color scheme ensures that integrated UI elements maintain a coherent appearance.
Follow these steps to create a configuration UI widget that enables seamless integration of new technologies into the Calibo Accelerate platform through the adapter.
- Establish a dedicated provider code specific to the technology for which you wish to build an adapter. This provider code is configured within the database.
Like a primary key in a database table, the provider code acts as a unique identifier to recognize any newly integrated technology within the platform. This identifier is essential for the platform to comprehend the technology's configuration properties and other associated attributes.
- Create a new folder named after the technology. For example, if the technology provider code is "SAMPLE_TECH," the folder name must be "SAMPLE_TECH." Make sure that the capitalization matches the provider code. We recommend you use uppercase letters in the folder name and insert an underscore between two words.
- Develop the configuration template UI within the technology folder as a React component. This React component should be designed using the design system of the Calibo Accelerate platform, specifically React Bootstrap. Default export the component. Ensure that the React component adheres to the recommended best practices mentioned in the Coding Standards and Guidelines section to ensure alignment with other widgets developed and integrated into the platform.
- Prepare the following folder structure for SAMPLE_TECH:
Copy
/SAMPLETECH
    index.js
    README.md
sampleTech-template.js - Place it at packages/data/configure-datastore/templates/SAMPLE_TECH, where
- The index.js file is the default export for sampleTech-template.js Copy
export { default } from './sampleTech-template'; - The sampleTech-template.js file is the entry point for the sample_tech configuration template. Construct a functional component by using React hooks. This component should be designed to accept specific props for seamless integration with the platform. As configuration values are stored via platform services, the component developer bears the responsibility of ensuring the correct callbacks are invoked. The component interface provides access to the following properties.
Copy
import React, { useState, useEffect } from 'react';

const IntegrationComponent = ({ tool, handleChange, handleCancel, testConnectionCallback, initialValues }) => {
  const [configValue1, setConfigValue1] = useState('');
  const [configValue2, setConfigValue2] = useState('');

  useEffect(() => {
    // Fetch existing configuration values using tool
    // Initialize state with fetched values if needed
  }, [tool]);

  const handleSave = () => {
    // Perform validation and call handleChange with updated config values
    handleChange({ value1: configValue1, value2: configValue2 });
  };

  const handleCancel = () => {
    // Call onCancel to handle cancellation or close behavior
    onCancel();
  };

  return (
    <div>
      <h2>Integration Configuration</h2>
      <label>Configuration Value 1</label>
      <input
        type="text"
        value={configValue1}
        onChange={(e) => setConfigValue1(e.target.value)}
      />
      <label>Configuration Value 2</label>
      <input
        type="text"
        value={configValue2}
        onChange={(e) => setConfigValue2(e.target.value)}
      />
      <button onClick={handleSave}>Save</button>
      <button onClick={handleCancel}>Cancel</button>
    </div>
  );
};

export default IntegrationComponent;
In this functional component, we utilize React hooks such as useState and useEffect to manage a state and perform side effects. The component receives technologyId, onSave, and onCancel as props, allowing it to interact with the platform and manage configuration values.
- The index.js file is the default export for sampleTech-template.js
-
Define the template props as follows:
Template Prop Description tool The provider code.
This is a unique identifier to determine the technology. This is used across the platform to refer to the technology being used, right from configuring it to create data integration, or data transformation jobs.
handleClose A callback function to close the event.
This function closes the configuration screen
handleChange A callback function handle data updates in the component.
Whenever the data in custom widget UI elements changes, this function should be called so that the values get stored in a form level object for further use when the users clicks the Submit button.
testConnectionCallback A callback function to handle the test connection API call.
If the testConnectionCallback is defined, a Test Connection button should be inserted in the custom UI screen for configuration. The click handler of the button should call this callback.
initialValues The initial values for configuration edit.
Whenever the configuration is about to be edited, pass in the initial values. This helps with prepopulating the form with the given values.
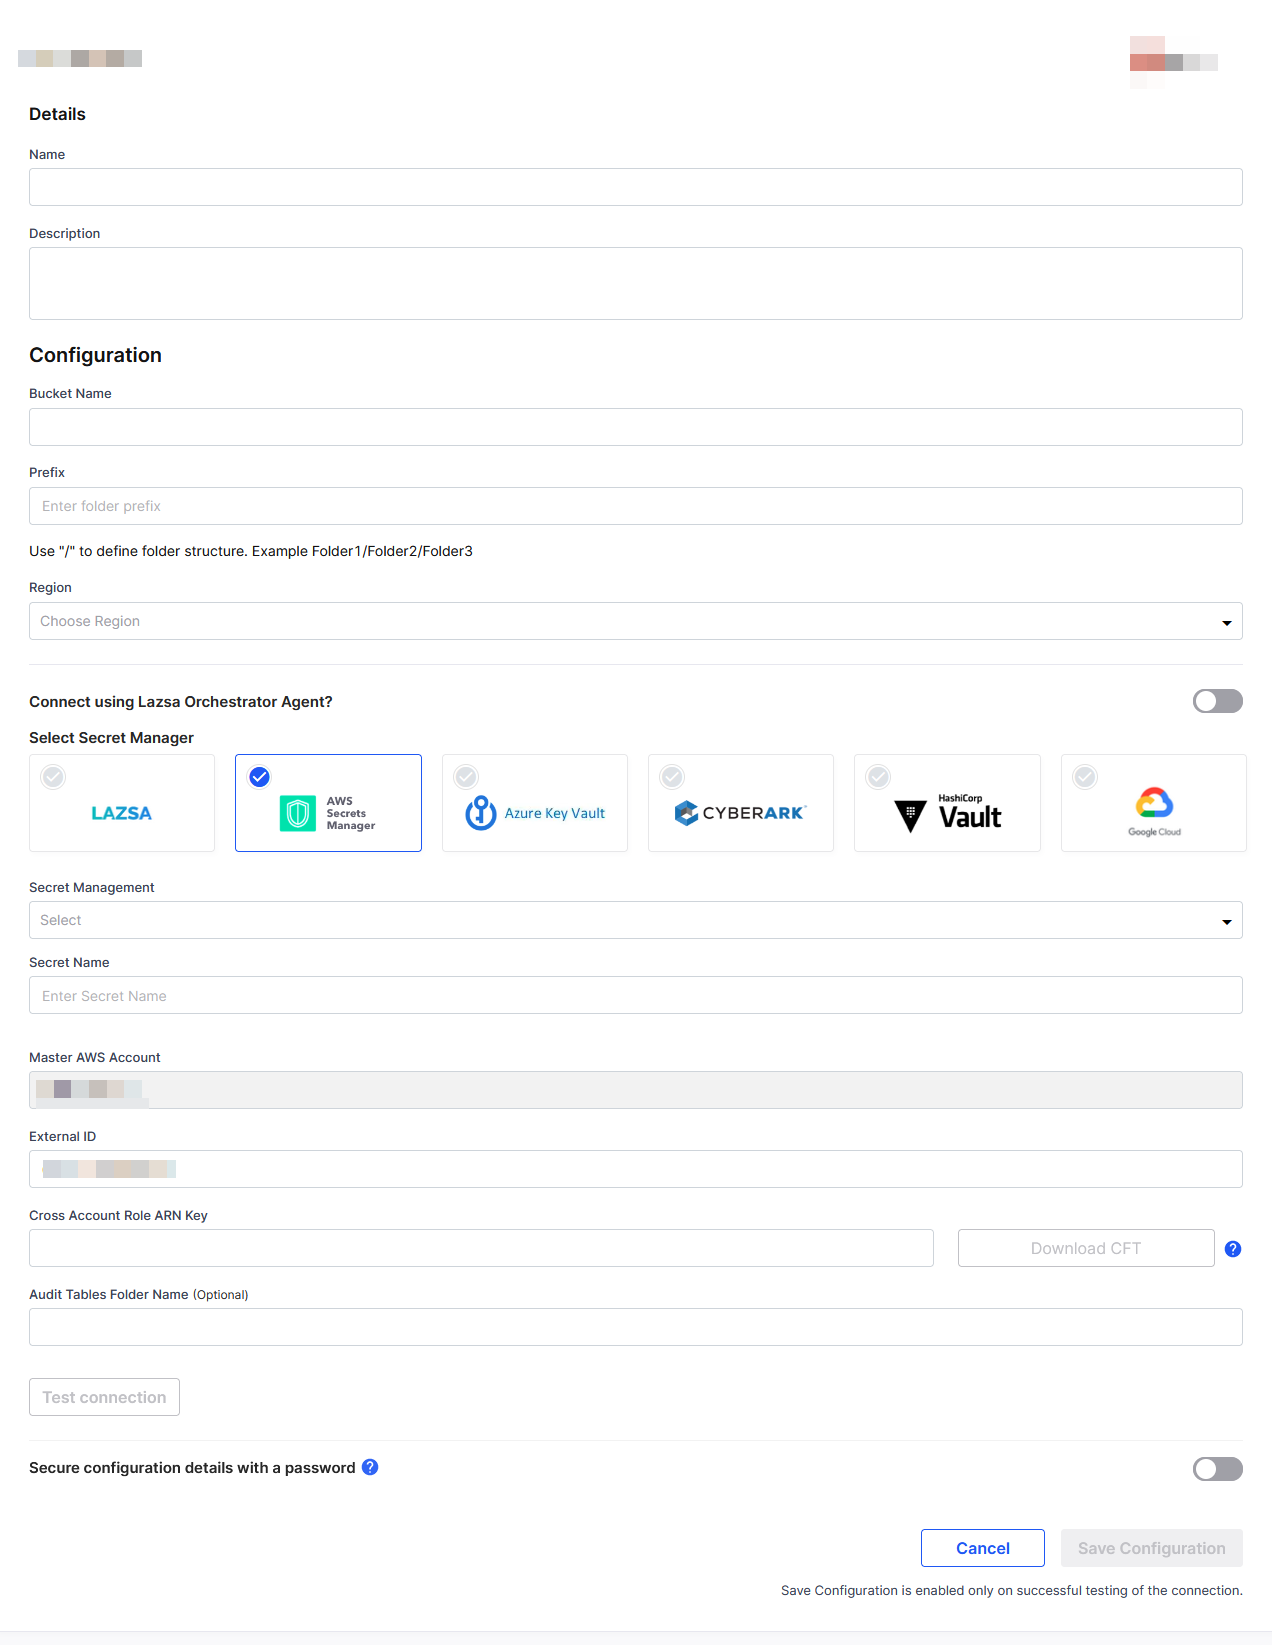
- After the component is ready for use, position the component folder inside the UI repository code at the following location: packages/data/configure-datastore/templates
This makes sure that the platform is able to read the component and show the developed configuration screen when the user selects the technology. The screen looks something like the following:
- Ensure that component validations are added to common configuration validators, located at: packages/data/configure-datastore/data-tool-configuration/save-configuration-validator.js
This involves validations around all the fields that are provided in the configuration UI. It can be name validation or URL, host and port validation. Validation rules would differ from technology to technology.
The technology will be available to be configured on the Cloud Platforms, Tools, & Technologies screen of the Calibo Accelerate platform. The technology logo will be visible in the Technologies & Testing Tools section. Click the Modify button in this section to view the screen where you can configure the connection details of the technology instance that you want to access from within the Calibo Accelerate platform.
-
You can password protect every configuration detail to be stored in the Calibo Accelerate platform. This serves as an additional security control for your saved connection details.
Data Pipeline Node UI Widget
Follow these steps to build a pipeline node UI widget for your preferred technology.
-
Create a unique provider code specific to the technology for which you wish to build an adapter. This provider code is configured within the database.
Like a primary key in a database table, the provider code acts as a unique identifier to recognize any newly integrated technology within the platform. This identifier is essential for the platform to comprehend the technology's configuration properties and other associated attributes.
Refer to the following sample queries:CopyINSERT INTO `setting` (`name`, `description`, `config_code`, `section`, `sub_section`, `config_version`, `selected`, `default`, `provider_code`, `logo`, `version`, `created_by`, `created_on`, `updated_by`, `updated_on`) VALUES
(MariaDB, mariaDB is an open-source relational database management system.', 'DATA_STORES', NULL, NULL, NULL, false, false, MariaSQL, '/mariasql.png', 0, 'tdas@altimetrik.com', now(), 'tdas@altimetrik.com', now()) -
After you add the technology to the platform by running a script similar to the reference script provided the previous step, enable it through the configuration screen. Once enabled, the technology becomes visible within a data pipeline.
-
To access the technology from within the data pipeline, associate it with a pipeline stage. You can add this technology to the pipeline by creating a stage in the pipeline.
-
Click the technology node within the data pipeline to open a side drawer for further configuration.
-
Create a new folder named after the technology provider code. For example, if the technology provider code is "SAMPLE_TECH," the folder name must be "SAMPLE_TECH." Make sure that the capitalization matches the provider code. We recommend you use uppercase letters in the folder name and insert an underscore between two words.
-
Develop the configuration template UI within the technology folder as a React component. This React component should be designed using the design system of the Calibo Accelerate platform, specifically React Bootstrap. Default export the component. Ensure that the React component adheres to the recommended best practices mentioned in the Coding Standards for UI Code Development section to ensure alignment with other widgets developed and integrated into the platform.
-
Prepare the following folder structure for SAMPLE_TECH:
Copy/SAMPLETECH
index.js
README.md
sampleTech-repository.js -
Place it at packages/data/configure-datastore/templates/SAMPLE_TECH, where
- The index.js file is the default export for sampleTech-repository.js.Copy
export { default } from './sampleTech-repository'; - The sampleTech-repository.js file is the entry point for the sample_Tech node template. Construct a functional component by using React hooks. This component should be designed to accept specific props for seamless integration with the platform. As configuration values are stored via platform services, the component developer bears the responsibility of ensuring the correct callbacks are invoked. The component interface provides access to the following properties.
In this functional component, we utilize React hooks such as useState and useEffect to manage a state and perform side effects. The component receives technologyId, onSave, and onCancel as props, allowing it to interact with the platform and manage configuration values.
- The index.js file is the default export for sampleTech-repository.js.
-
The sampleTech-repository component receives the required input props like the following :
Property Description providerCode Unique provider code specific to the technology.
providerCodeSubType Technology sub type if applicable.
streamId Unique feature ID to get the feature details. releaseId Unique ID for release to get the release details. invocationContext This is an object which contains data about the configuration, configurationType, isDPSReuse, reUseConfigs, ediatble. handleSideMenuClose A call back function to be called on close of the side menu. repository Repository details. -
The sampleTech-repository component enables you to handle the configuration view and the respective actions like save and cancel. If the technology is already configured, the same component allows to view and edit the existing configuration.
-
For the technologies which require multi step configuration along with other details, the widget stepper component is also required to configure the respective technology. The attributes for the widget stepper component are given in the following table:
Attribute Description toolLogo This is for the logo of the tool. You must follow the standard specifications for the logo. It must not violate any copyright information and must be as per the published guidelines of the vendor.
toolHeading This attribute denotes the name of the data pipeline tool. It is displayed when configuring or creating a job within the data pipeline.
toolSubHeading This attribute is used to capture additional information or a brief description about the data pipeline tool. It can provide a context or supplementary details.
existingConfiguration This is an object that encapsulates all the configuration details related to the configured tool. This object is essential for editing a configuration.
configurationLabel This is the name or label of the configuration tool. This explains what the configuration setting does and how it affects. tool This attribute denotes the provider code of the tool. Job configuration is handled based on this. This is a unique identifier to determine the technology. This is used across the platform to refer to the technology being used, right from configuring it to create data integration, or data transformation jobs. availableDataStores The list of configurations for a technology which is configured as a source and target. getSteps This attribute specifies the data-widget steps. It returns a list of specific data-widget steps or specific pages that are required for the tool. handleSubmit A callback function that is invoked when the user initiates the action to save the tool's configuration. This function handles the process of saving the configuration data. invocationContext This is an object that contains data about the job node, sources, target node, and repository details consumed by the widget and its child components.
projectId A unique identifier for the project. It is used to fetch the project information. releaseId A unique identifier for the release within a project. It is used to fetch the release information. workstreamId A unique identifier for the feature in which data widget is being created. It is used to fetch the feature information. pages The 'pages' array is a dynamic collection of pages, continuously mapped to widget step names, such as 'FIRST_PAGE,' 'REPOSITORY_PAGE,' and 'SOURCE.' It dynamically renders the page component based on the value of the page type. filteredDataSourceTypes This is a list of filtered data stores specific to particular types, with the dropdown for that subtype being populated accordingly. ignoreSubtypes IgnoreSubtypes is an array of provider codes used to selectively exclude specific technologies as subtypes when needed. For example, when configuring QlikSense, it allows you to exclude 'Snowflake' if it is not a subtype of RDBMS. -
Widget component is mapped with multiple steps and each step is mapped with the page component, for example 'FIRST_PAGE' is the folder name for the page which is mapped with the First Step (job name).
Copy/FIRST_PAGE
index.js
first_page.js -
Place the folder at packages/data-stacks, where the index.js file is the default export for first_page.
INSERT INTO `datapipeline_stage_techstack` VALUES (31,'Data Sources','ab25b15f-0533-4d21-8504-38b79211b121');| What's next? Product Release Orchestration Adapters |